1000km Algarve - Race Analysis
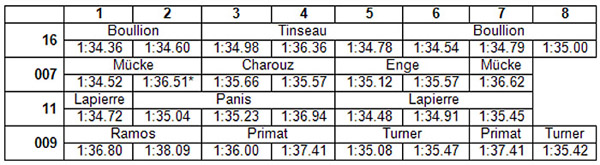
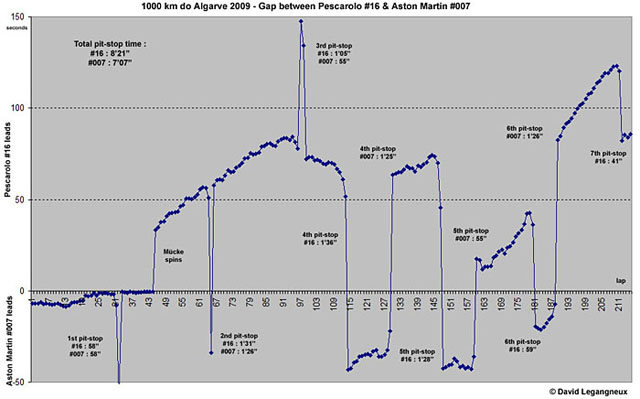
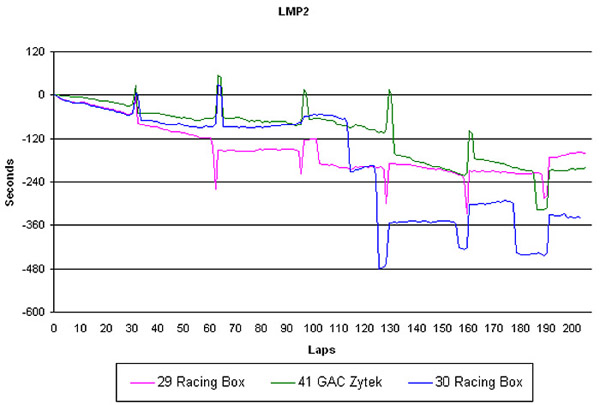
Paul Truswell’s Reflections I had intended to write summaries during the race itself, but as a novice hack I am on something of a voyage of discovery. My first discovery was that I cannot write and watch a motor race at the same time. The second discovery was that it is rather fun being in a position where one can go and find out things during the race; so while Janos was glued to the screens in the pressroom, puzzling over places won here and lost there, he would keep dispatching me to the pit lane to establish the reason for a long pit stop or a delay on the circuit. With a day off today (Sunday) to relax following a rather late night last night, it is an ideal opportunity to sift through the impressions and the data from a race that held plenty of interest throughout. LMP1 race Realistically, the P1 class could have been won by any one of four cars. Provocatively, and with apologies to those concerned, I will exclude from that list the Strakka Racing Ginetta-Zytek, and the no. 10 Senna / Monteiro ORECA-AIM. The four that I have selected are the two AMR-run Lola Aston-Martins, the no. 11 ORECA and the eventual winner, the no. 16 Pescarolo. During the race, there were 10 changes of lead; which, once the no. 11 ORECA had the fuel leak problem, cycled between the 007 Aston Martin and the no. 16 Pescarolo - and after Stefan Mücke’s little spin, the Pescarolo was always on top. However, even allowing for the 34 seconds lost in that incident, I believe the French car still held the upper hand. And although Lapierre set the fastest lap of the race, I believe that the numbers below show that Boullion and Tinseau would still have won even if the ORECA had not had its fuel leak problem. First, let’s look at the pit stop schedule for each of these teams. First of all, the number of laps in each stint: Second, the time spent in the pit for each stop:* this was the stop where the Pescarolo repaired the front bodywork. Finally, my favourite, the average lap time during each stint (excluding the ‘in’ and ‘out’ lap, and the first lap and last laps of the race): * this includes the stint in which Mücke lost time with a spin. David Legangneux has also been number-crunching and contributes this graphical analysis of the race-long battle between #007 and #16: LMP2 race The Quifel ASM Team’s Ginetta Zytek was quickest in every one of the free practice sessions, quickest in qualifying, quickest in the warm-up, and set the fastest lap of the race. It led all but seven laps of the race, so there is no doubting the justice that Olivier Pla and Miguel Amarel won the class. That they did so with a two-lap advantage over the next car in the class (and at one point even held position in the top six overall places) is further testimony to a perfect weekend. Behind, however, an absorbing race ensued between the two Racing Box Lola-Judds, and the GAC Zytek. Hopefully, this graph shows how the order changed behind the Quifel car over the course of the race.
What I have done is to plot the gap between the leading LMP2 car and each of the chasing cars. Notice how the pink line (representing the Ceccato/Francioni/Piccini Lola) maintains a consistent pace after a disappointing start, and as the end of the race approaches, is able to increase the gap and take the runner-up spot.
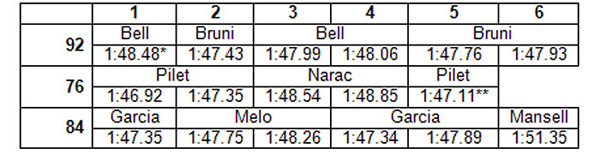
The no. 30 Racing Box of the other Piccini, Andrea, sharing with Thomas Biagi and Matteo Bobbi can be seen to be challenging strongly in the first half of the race, but dropped away in the second half firstly with radiator problems and then after an off-course excursion. GT2 race As so often, the GT2 race was close, exciting and full of action from start to finish. Due partly to the bunching of the field caused by holding the red lights on as the rolling start approached, and by some over-exuberance on the part of Francisco Cruz Martins in the no. 88 Felbermayr car, we had about four cars off on the outside of the first corner. They all managed to make it round the lap, but Martins’ reward was to be posted as the first retirement, so great was the damage he inflicted upon himself, and Porsche works driver (and team-mate) Richard Lietz initially lost over three and a half minutes replacing the damaged wheel. This would pale into insignificance when the car suffered a delay of more than an hour at its next stop due to the bodywork and associated rear axle damage. This left the way open for a lovely three-way scrap between the Patrick Pilet / Raymond Narac IMSA Performance Porsche, the Rob Bell / Gimmi Bruni JMW Ferrari and the Antonio Garcia/Jaime Melo/Leo Mansell Team Modena Ferrari. The Porsche was slightly more economical on fuel, it seemed, and was able to complete the 190 laps of the GT2 race with just five stops. Here is the number of laps per stint table: And what about the average lap times? I hear you ask – surely you’re getting the hang of this now? Make what you will of this: *included spin avoiding Farnbacher car, where Bell lost about 15 seconds.
**includes final lap, which was Pilet’s fastest lap of the race. To complete the GT2 story, we just need to consider the times spent in the pits by the JMW Ferrari and the IMSA Performance Porsche: *includes time to effect repairs to bodywork To summarise the salient points: Bell lost about 15 seconds spinning off in the first hour, the IMSA car lost about 90 seconds carrying out repairs, and the gap at the end, before Bruni relaxed on his last lap, was just 10 seconds. But for the problems which occurred at the start, the outcome could have been different. And at the finish, the Modena Ferrari was just two and a half minutes behind the JMW car. For your homework tonight, work out how much further up it would have been had Melo got back in for the final stint. Paul Truswell |